In this guide, we’ll show you The Lord of the Rings: Return to Moria Map and reveal the interesting Locations you’ll explore in Moria.
The Map of The Lord of the Rings: Return to Moria is a complex maze of Dwarven cities and massive caves, filled with danger and the forces of darkness. Cook up some good Food and ready your sharpest Weapons — we’re going to tell you what you need to know about the Map of Moria.
The Lord of the Rings: Return to Moria Map
The Lord of the Rings: Return to Moria Map is different for every playthrough, depending on the world seed entered when you created the world.
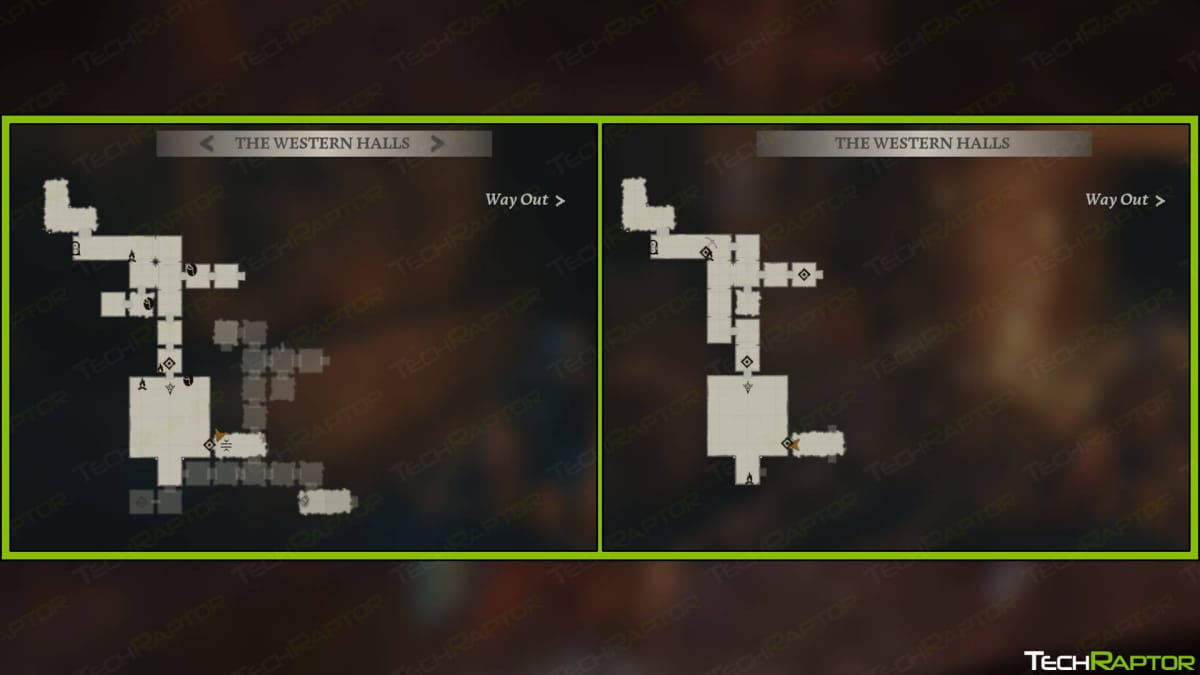
As far as we can tell, the Map is not exactly randomly generated; rather, it appears to be randomly assembled. The Eleven Quarter, for example, seems to look the same between the two worlds I generated, but it (and the surrounding halls) are not in the same exact locations.
Take a look at these two maps of The Western Halls as an example:

The Map on the left is my first playthrough where I’ve progressed through The Western Halls and The Lower Deeps. The Map on the right is from my second playthrough. Notice how the rooms at the top part are not exactly lined up.
The general beats will be the same — you’ll go through The Western Halls, into the Elvish Quarter, and then down into the Mines of Moria — but there are subtle differences in how the rooms are actually arranged.
How to Fast Travel in The Lord of the Rings: Return to Moria
You can fast travel in The Lord of the Rings: Return to Moria by interacting with a Map Stone. You’ll have to rebuild the Map Stones using Black Diamonds which can be acquired from Orkish Chests in certain areas.
You can also Build a Map Stone anywhere in the world. This will allow you to fast travel directly to your Camp (or anywhere else you’d like to place one).
It’s important to note that fast traveling is not instant teleportation; while you do save time in the real world, the game treats fast traveling as if you walked that distance on foot. That means that your Energy and Hunger will be lower when you get to the other side. It’s important to carry Food or Rations with you if you’re fast traveling to somewhere that isn’t one of your bases.

The Lord of the Rings: Return to Moria Locations
Here are all of the notable Locations in The Lord of the Rings: Return to Moria that we’ve found thus far.
The Western Halls
The Western Halls is the first major region of Moria where you begin your adventure. Gimli intended for this to be the point where a Dwarven expedition would step foot into Moria, but a mishap trapped you inside.
The Doors of Durin
The Doors of Durin are the western gates into Moria. The Fellowship of the Ring entered these doors when they decided to go into Moria. After the fall of Sauron, Gimli has cleared the rubble from the doors and has been attempting to open them to no avail; it is later revealed that the forces of shadow have locked them from the other side with dark magic.
Westgate
Westgate is the abandoned town on the opposite side of The Doors of Durin. You’ll likely build your first Camp here.
The Elven Quarter
The Eleven Quarter is a forested enclave that was once apparently a home away from home for Elves. Now, fell beasts occupy this land.
Great Forge of Narvi
The Great Forge of Narvi is the first of the Great Forges of Moria you’ll encounter. Certain Weapons and Armor can only be Crafted in specific Great Forges — once you’ve restarted them.
The Mines of Moria
The Mines of Moria are well-known to Tolkien fans; it is here that The Fellowship fought a climatic battle against hordes of Orks. Take care when making the descent as you can easily fall to your death.
Though it doesn’t seem like it, it’s possible to climb back out of The Mines of Moria. Remember, you can always Build some platforms if you can’t quite find the path back out!
The Crystal Descent
The Crystal Descent is the gateway to The Lower Deeps, the second region of The Lord of the Rings: Return to Moria. You’ll need to get your hands on specific materials before you can repair the Lift (elevator) and make your way into the next region of Moria.
The Lower Deeps
The Lower Deeps are an area that is much closer to natural caves than an inhabited city. Poisonous Mushrooms and mysterious clouds of dark energy pollute the area, and the Goblins and Orks that patrol this area are tougher than anything you’ve fought yet. Worse of all, you’ll encounter massive Trolls secreted away in dark corners of The Lower Deeps.
A Flooded Forge
A massive pump station had previously held back underground water, but it has since fallen into disrepair. You’ll need to build a pier across the water and repair the pumps, but the water isn’t entirely safe…
Tomb of Kings
As the name implies, the Tomb of Kings is where several honored Dwarves are buried, including Durin I. This is also home to Durin’s Muznakan.
The Eastern Stairs
The Eastern Stairs head further east into Moria and toward your ultimate destination, but you’ll have to rebuild them first.
That’s the end of our The Lord of the Rings: Return to Moria Map and Locations Guide. Have a gander at our other guides below!

