
After making your way through the Eldin Volcano region in The Legend of Zelda: Echoes of Wisdom, you will take on the region’s main dungeon, Eldin Temple. This massive maze of lava and volcanic rock is one of three dungeons Zelda will encounter during “Lands of the Goddesses,” which is the over-arching main quest after completing “Still Missing”, and the Hyrule Castle dungeon. This guide will take players through the entire dungeon, showing how to complete Eldin Temple in Echoes of Wisdom, where to find every treasure chest, and how to defeat the dungeon’s boss, Volvagia.
Related
All Outfits in Echoes of Wisdom (& How to Get Them)
Zelda can collect a wide range of clothing and outfits in Echoes of Wisdom. Here’s how to get them all.
How to Reach Eldin Temple in Echoes of Wisdom – Stilled Eldin Volcano


When entering Eldin Temple, your goal for Tri should be five power units. This happens when Tri reaches Lv. 6. If you are low, seek out the smaller rifts on the map. You’ll find them in areas where the main rift is already cleared, but rifts are still visible on the map. Completing these smaller rifts will partially level-up Tri, as well as earn Zelda some
Might Crystals
.

Once Zelda, Tri, and Darston make their way through the Crater Shortcut that takes them into the heart of the region’s namesake volcano, they will find the entrance to the Stilled Eldin Volcano rift. Like most of the dungeons in Echoes of Wisdom, the entrance to Eldin Temple is found within this portion of Eldin Volcano that has been swallowed by the main rift.

After entering the Stilled Eldin Volcano, make sure to learn the Lava Rock Echo if you do not already have it. It will be extremely important in the rift. The second echo that will be useful is the Water Block. Surprisingly, you can use the Water Block over lava. The first enemy you’ll encounter is Fire Octo. As you prepare to cross, you can send out a flying Echo, such as the Guay. They can dive to attack the Fire Octo, even when its in lava.

To start, use the Lava Rock and Water Block to make your way across. You’ll want to head to the right, to the platform that is not floating on lava. From there, you’ll be able to see a Treasure Chest on a platform to the northeast. From here, you can continue to use Lava Rocks to cross the lava, and Water Blocks to cross the longer channels where there is only space.
When you reach the Treasure Chest, open it to receive five Rocktatoes. Watch out for the Dark Lizalfos and Dark Zirro that attack after opening the chest. You can use Swordfighter Form here, as the Dark enemies will drop energy.
- Treasure Chest 1: 5 Rocktatoes
Head to the northeastern corner of the same platform, then use Water Blocks (you’ll need five at most) to head west in a straight line. Before moving higher, you’ll want to grab the second Treasure Chest.
- Treasure Chest 2: Purple Rupee (50)

Now, head back to the same platform that you started heading west from. First, use a Lava Rock to jump to the climbing wall on the other side of the lava river. Climb the wall, and you’ll be at the base of a second, much bigger climbing wall. Here, you can try to quickly reach the top of the platform before enemies reach you, or you can use Swordfighter Form to clear them out.
Once you reach the top of the platform, you’ll find a pool of lava and several Fire Octo. There’s no need to dally here, so head west as soon as you can. Head past the platform with the first air vent, and you’ll encounter two Zirro. If you already have the Zirro Echo, you can pass them by. Keep going until you reach the third air vent, in front of the lava wall.
The easiest option here is to use a Ghirro Echo. These not only float, but they also accelerate. Hold on to the Ghirro, then use the air vent to send you skyward. You will then be able to head east, all the way to the entrance to Eldin Temple. Make sure you are prepared, then head inside.

Related
Zelda: Echoes of Wisdom – Big Shot Guide
In Echoes of Wisdom, a River Zora is lost at sea, and it’s up to Zelda to bring him back to shore.
Eldin Temple Walkthrough First Floor (1F) – Echoes of Wisdom
By this point in the game, you will have the ability to learn multiple high-level combat Echoes. Using the Sword Moblin Lv 3,
Darknut Lv 3
, or
Lynel Echo
will make combat much easier. For the sake of brevity, we used these powerful Echoes to quickly get through each dungeon chamber. However, one of the great joys of
Echoes of Wisdom
is taking the time to experiment with Echoes. The game is incredibly fun either way.
When you first enter Eldin Temple, make sure to activate the Fast-Travel waypoint. You can also use the Hot Springs to recover any hearts, though any of the Bed Echoes work faster.
First Chamber:

Head through the first door, and you’ll enter a chamber with magma rock floors, and two Fire Keese. Swordfighter Form will quickly dispatch these pesky creatures, or any combat Echo of your choosing. The magma rock will burn Zelda, just like outside the dungeon. There are three doors leading out of this chamber, though one will be locked. You can head through either door first.
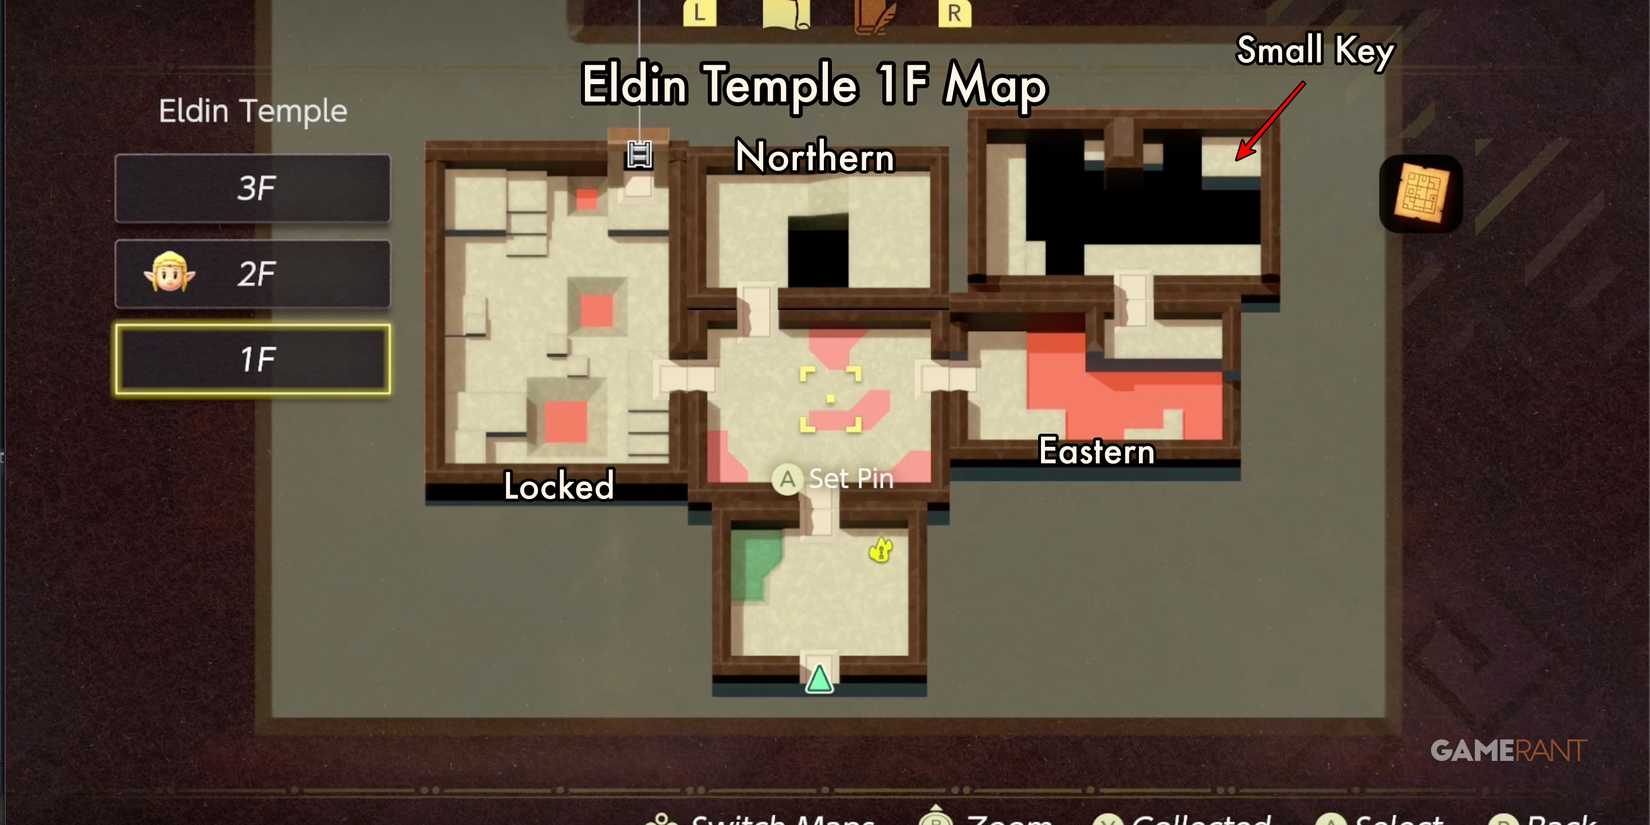
Northern Chamber:
Heading into the north chamber, you’ll encounter two Dark Zirro enemies. Use the Swordfighter Form to take them out with the bow. Afterward, head to the northeastern corner of the chamber and destroy the two breakable blocks. Beneath, you’ll find the first Treasure Chest in the temple. This chest is partially buried, so you’ll need to use Bind to pull it out. Inside you’ll find eight Twisted Pumpkins. This is it for the north chamber.
- 1F ITreasure Chest 1: 8 Twisted Pumpkins
Eastern Chambers:

Returning to the first main chamber, you can now exit the northeastern door. The first chamber you find will have several lava geysers and an upper ledge you must reach. There are likely multiple ways to get through the first chamber. We used smaller boulders to cross over the first lava geyser, then create a Lava Rock on the second geyser and let the lava raise you to the upper level.
Entering the next chamber, you’ll see it’s mostly an open pit with air vents around the edge. Use a Ghirro Echo to float across the chamber to the Treasure Chest in the northeastern corner. Inside the chest you’ll find the first Key.
Locked Chamber:
Upon entering th locked chamber, it will appear that it is filled entirely with lava. However, after a moment, you will see that lava rises and recedes. When the lava is at its lowest, you’ll see a Treasure Chest in the southwestern corner that must be pulled out of the ground with Bind. You’ll find a Golden Egg inside. Defeat the two Tweelus enemies, then use Bind to remove the Lava Rock off the ledge on the west side of the chamber. There, you’ll find a button that opens the exit in the northeast corner. This is the first floor exit.
- 1F Treasure Chest 3: Golden Egg
Make sure to collect the
Tweelus Echo
before leaving the first floor, as it will come in handy later.

Related
Zelda: Echoes of Wisdom – All Side Quests
Here are all 50 side quests and their rewards in Zelda: Echoes of Wisdom.
Eldin Temple Walkthrough Second Floor (2F) – Echoes of Wisdom

Side-Scrolling Chamber (Eldin Temple Dungeon Map):

The first second-floor chamber changes perspective to side-scrolling, and is fairly simple to get through. Place a Lava Rock on the first lava geyser and jump to the climbing wall. When you approach the second lava geyser, summon a Lava Rock while on the wall, then jump onto it. You can then summon an Old Bed to get the extra boost needed to jump to the higher ledge.
In the next portion of the side-scrolling chamber, you’ll first encounter a single Fire Keese. You will see hot air vents in multiple areas. Your first task is going to be collecting the next Treasure Chest in the lower section of the chamber. Go down the first ladder in the chamber, then use a Tweelus or Boulder to block the air vent. Head down the next ladder.

You’ll first want to head left, but make sure to pay attention to the lava, which slowly rises and falls. Drop to the left, and you’ll see the blue trigger mechanism that Zelda must hit to activate. The easiest way to do this is to use the Bow. Hitting the Trigger device will raise the gate to the right. Use the Strandtula Echo‘s web line to head back to the starting point.
Now head right, placing a Lava Rock in the center of the rising lava and using the Bow to take out the Torch Slug. Head into the final area to collect another Key from the Treasure Chest. Head back to the chamber with the hot-air vents.
- 2F Treasure Chest 1: Small Key
Head up to the climbing wall blocked by hot-air vents and wait for the timing to be right to climb. At the top, you’ll see a Treasure Chest to the left. Summon a Tweelus and lift it up over Zelda’s head. This will allow her to walk under the vents and open the chest, which contains the Dungeon’s Map.

Now, make your way up the ladder to the next half of the second floor. Make sure to activate the waypoint in front of the locked door, which you now have the key to open.

Related
The Legend of Zelda: Echoes of Wisdom – 8 Best Monster Echoes, Ranked
In Echoes of Wisdom, Zelda can unlock plenty of monster echoes, some of which are stronger than others.
Eldin Temple Walkthrough Dark Link Bombs – Echoes of Wisdom

How to Defeat Dark Link in Eldin Temple:
When you enter the chamber after the locked door, you’ll immediately be greeted by Dark Link. This time he will be wielding his classic Bombs. Defeating Link in this fight is how you get traditional bombs in Echoes of Wisdom.

Link will toss bombs down toward Zelda, and Zelda can pick them up and toss them in any direction she wants. At first, Link will be too high for the bombs to do any damage. Your first goal is clearing a path to the climbing wall by destroying the breakable blocks with Link’s bombs. If you have Echoes of Wisdom‘s Frog Ring, you will be able to jump on top of the blocks and head straight for the wall.

When you reach the top, you can use the Swordfighter Form to attack with the Sword of Might or the Bow. You can also summon a powerful Echo to help. Link will teleport around the arena after taking a certain amount of damage, so it’s difficult to rely on Echoes to do the job.

Link will teleport to lower ground, and this will give Zelda a much better tactical position. Continue to use arrows until Link reaches Phase 2.
Dark Link Bombs Phase 2:

In the second phase, Link will become much more aggressive, throwing out multiple bombs at a much faster pace. Luckily, many of the blocks destroyed by his bombs will drop energy bubbles for Zelda. Follow Link as closely as possible and use the sword or bow to constantly attack him.
Watch out for the upgraded bombs, which will actually chase Zelda down. As long as you keep moving, and constantly attack with the Bow, you will take him out fairly quickly. After defeating Dark Link, you’ll collect the Bombs of Might, which can be upgraded at Lueberry’s like the other Swordfighter Form weapons.

Related
Zelda: Echoes of Wisdom – Eldin, Faron, or Lanayru: Where to Go First?
You’ll need to clear the giant rifts in Eldin, Faron, and Lanayru in Echoes of Wisdom, but which one should you do first?
Eldin Temple Walkthrough Third Floor (3F) – Echoes of Wisdom
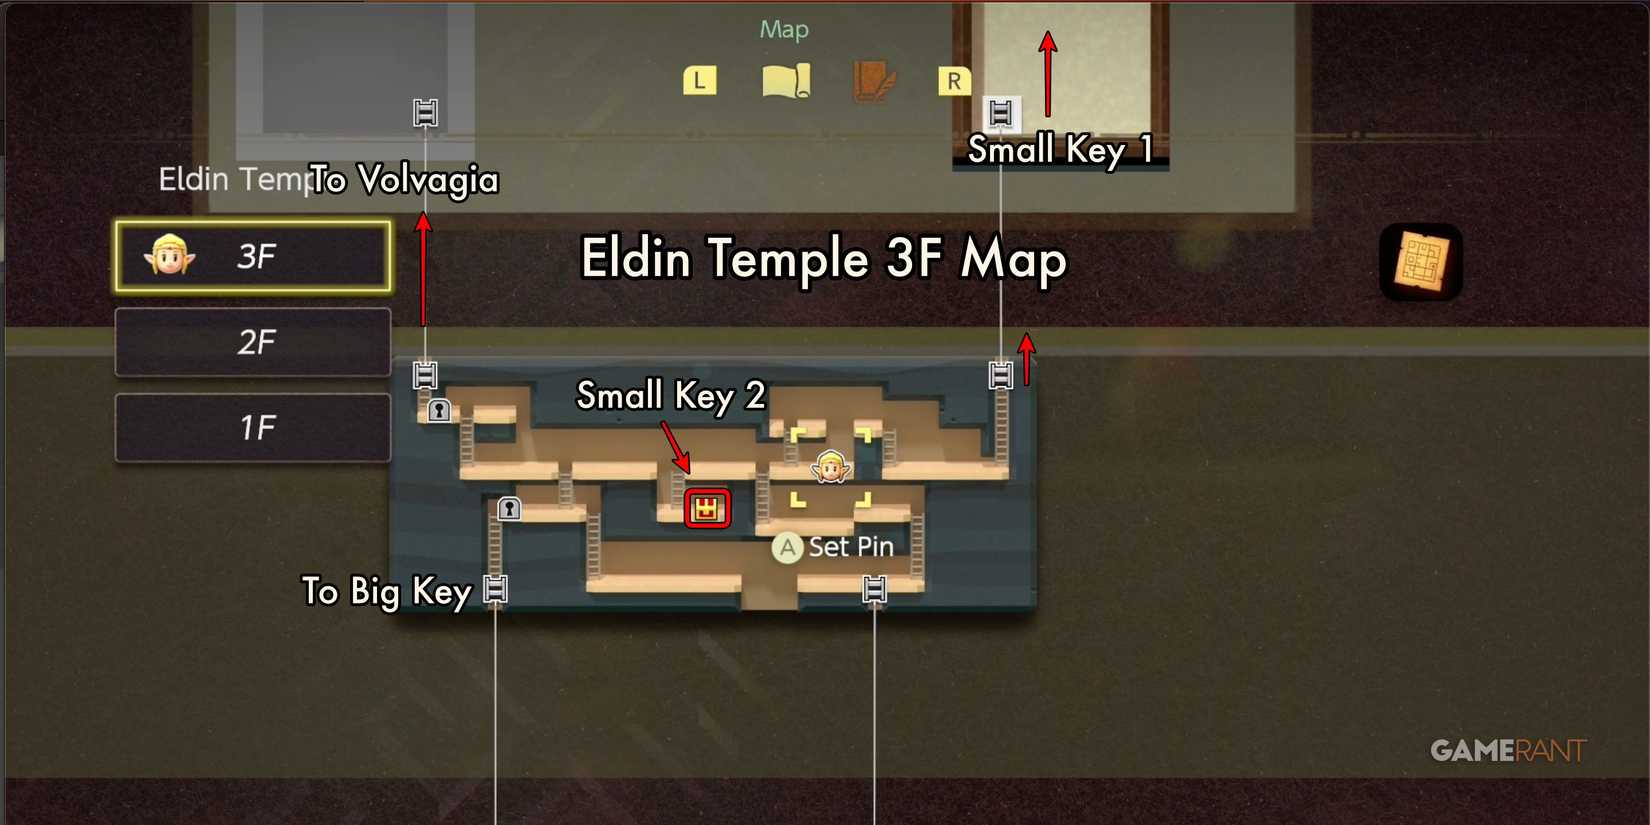
Get Both Small Keys and Fire Wizzrobe Echo:
The first thing to do after beating Dark Link and reaching the third floor is to make your way through the third floor chambers, collecting both Small Keys and th Fire Wizzrobe Echo.
First, you are going to make your way to the area above the northeast section of the Third Floor’s main chamber. Check the map above to see the first path. From the main ladder to the third floor, make your way to the northeastern corner. You’ll encounter light resistance in the form of two Tweelus and one Fire Keese. Use bombs or Bombfish to clear the breakable blocks blocking your path. Use the ladder after the blocks.
At the top of the ladder, you’ll encounter a large room with one Tweelus, and several breakable blocks. Destroy the blocks in the northwestern corner to find a Treasure Chest containing a Silver Rupee (100). Destroy the blocks in the northeast corner to reveal the exit.
- 3F Treasure Chest 1: Silver Rupee (100)
The last northeastern chamber is a combat lockdown chamber featuring the Fire Wizzrobe. Here, the Bow of Might is your best friend, but you can also summon flying Echoes like the Guay or Crow to help. Make sure to collect the Fire WIzzrobe Echo, as it is one of the best in the game. Once it is defeated, the chest containing the first Small Key will be revealed.
- 3F Treasure Chest 2: Small Key 1
Head back out the way you came, all the way until you are in the northeast corner of the main third floor chamber. Head directly west and you’ll spot one of the Dark Webs blocking your path. Destroy it, and you’ll see a small chamber below you filled with breakable blocks. Remove the blocks to find the Treasure Chest containing the second Small Key.
- 3F Treasure Chest 3: Small Key 2
2F Big Key Detour:
Looking at the map, you’ll see there is a ladder that leads back down to 2F in the southwestern corner of the third floor chamber. This is the path you need to take to collect Eldin Temple’s Big Key. Make your way to the lock and head down the ladder. You’ll encounter a small chamber that acts as a half-way point. Head down the ladder into this chamber.
Make your way down to the bottom of the chamber, where you’ll find a large climbing wall that leads to the large chest containing the Big Key. Be careful, opening the chest and taking the key will cause the lava to begin to rise. Be ready to make your way up quickly. Having Echoes of Wisdom’s Climbing Band can be a big help here.
When you reach the end, you’ll see the final ladder crumble apart. Quickly summon a flying Echo and glide off the platform towards the climbing wall to the left. If you do this quickly, you’ll catch the climbing wall and make your way out.
Path to the Final Door:
Once you’re back to the main third floor chamber, head to the final lock in the northwest corner. You can either destroy the blocks in ther way of the ladder, or use an Echo to go up the small chamber to reach the lock.

The final long chamber is mostly covered in lava. However, there are several air vents, and the Ghirro can make reaching the end somewhat trivial. Use the Ghirro from the first platform to reach the halfway point. Then use a Lava Rock on the lava geyser to reach the higher level. Use the Ghirro to reach the final door and Fast-Travel waypoint.
Make sure you are ready to take on the final boss. Having a way to refill energy will be extremely helpful here, as the Bow of Might and Bombs are the best weapons for this fight. With the final waypoint, you can head to any of
Echoes of Wisdom
‘s Smoothie Shops
to make Salted Milky Smoothies that fully refill energy. You need One Rock Salt and One Fresh Milk for each Smoothie.

Related
Zelda: Echoes of Wisdom – Lanayru Temple Walkthrough
In Lanayru Temple, Echoes of Wisdom players must deal with a dungeon-spanning Heat and Freeze mechanic that can be tricky to complete correctly.
Eldin Temple Beat Volvagia – Echoes of Wisdom

How to Beat Volvagia in Echoes of Wisdom:
Unlocking the final door takes you into Volgavia‘s chamber for Eldin Temple‘s final showdown.

Volvagia has a fairly simple attack pattern that allows Zelda to utilize the Bow of Might to attack from a distance. The large red dragon will hover around the arena, then disappear into the lava. Shortly after, it will pop its head up from one of several locations. When this occurs, Zelda must attack the green orb Volvagia wears around its neck.

To do this, get somewhat close to the dragon and hold ZL to automatically target the green orb. Volvagia has no other lock-on points, so it’s difficult for the aim system to get confused.

Volvagia has two main attacks that it will use to try and stop you from attacking. The first is a large green ball of electricity. This is usually Volvagia’s first choice for attacks, and will launch it right after popping its head up.

The second type of attack is a flame projectile that Volvagia will release while turning its head, creating a fan of flames.
Both attacks are relatively slow-moving, and meant to take up precious attack time. The ball of electricity will slowly move in your direction, so your best bet is to move past it, closer to Volvagia, as it will not completely change direction. Volvagia has a limited window of vulnerability each time it pops up, so try to act quickly.
With a flame attack, the closer you are to Volvagia, the closer the spread of the attacks will be. You can back up to make more space to move inbetween attacks. Another option is to just let them hit you if you have plenty of healing items. Volvagia also has a straight line flame attack as well, which can do significantly more damage. This attack is much shorter, so dodging it once will usually be enough.
Use
Zelda’s Bed
to heal while Volvagia is flying around the arena. You’ll have a small window, but it could definitely help.

The goal for each attack cycle should be to burst the green orb. If you attack the orb enough times before Volvagia goes under, the orb will burst, causing the dragon to slump over. During this time, it is vulnerable to all attacks. If you have the Lynel, Darknut Lv 3, or any other powerful Echoes, have them ready for this occasion.
Phase 2:

In the second phase, Volvagia only appears to add a single new attack, which only seems to occur in specific locations. At certain times, Volvagia will launch a stream of liquid fire that creates a large circular pool, causing AOE damage when Zelda is within it. This only occurred for us when he popped up from the magma stone section in the arena.
Other than that, the second phase will continue much the same as the first. Continue attacking the green orb in the same way, and avoid its attacks when you can. Volvagia will eventually go down.
Volvagia Rewards (Din’s Sanction):

Like all final boss fights in The Legend of Zelda: Echoes of Wisdom, Volvagia will offer the following rewards upon defeat:
- Tri Level-Up
- Five Might Crystals
- One Heart Container

Because Eldin Temple is in the Lands of the Goddesses, defeating Volvagia will also earn Zelda Din’s Sanction. This will conclude the Eldin Temple dungeon.

- Released
- September 26, 2024
- Developer(s)
- Nintendo , Grezzo
- ESRB
- E10+ For Everyone 10+
- How Long To Beat
- 20 Hours
- OpenCritic Rating
- Mighty

